
S2K Commerce - Shopping Cart
Actions
S2K Commerce - Products Dropdown
Actions
Web Content Viewer
Actions

How to Paint Your Ceiling & High Walls
High ceilings and walls make a home feel open, spacious, and stately. When it’s time to paint them though, it may at first seem like a daunting task. It’s not, as long as you know how to safely close the gap between your brush and the surfaces you want to paint. Keep reading to learn how to paint ceilings and high walls.
Step 1: Choose a Ladder or Scaffold
Start your project by deciding on your method of reaching the high surfaces. Using a ladder or a scaffold along with an applicator extension pole is the safest and easiest way to enable you to reach high walls and ceilings with a brush or roller. So, how do you know if a ladder or scaffold is the right approach for your room?
Ladders
In many cases, a ladder will be sufficient. It is imperative to use an appropriate ladder for the task at hand. Multi-function articulating ladders, platform ladders and 6’ or taller stepladders are good options for painting projects. Avoid using a ladder that requires you to overextend yourself to reach where you’re painting. If this is the case, your ladder is too short. Never stand on the top three rungs. Don’t ever stand on the top step of a stepladder. Use a ladder rated for the appropriate job type and weight limit. Check the label or sticker on the side of the ladder to see how much weight it can support. ANSI Type IA ladders can hold up to 300 pounds and are commonly used in commercial or professional settings. Type I ladders can hold up to 250 pounds, while Types II and III can support 225 and 200 pounds, respectively.
SAFETY ALERTS!
Never exceed a ladder’s maximum load limit. There should only be one person on a ladder at a time.
Never climb a ladder if you are ill, impaired, or otherwise in a less than ideal physical condition. If the ladder’s or your condition makes you uncomfortable climbing, trust your instinct and keep off of it. The more distracted you are, the more likely a fall can occur.
Always place the ladder solidly on the floor. Never try to move the ladder position while you’re on it and always keep your body centered between the rails of the ladder. Don’t place a ladder in front of a door that is not locked or blocked off. Keep the ladder rungs and other surfaces free of anything that can be a slipping hazard.
To reach a very high ceiling, you may need to use an extension ladder. Be sure to protect your wall from potential scratches and gouges from the ladder ends by investing in ladder covers or ladder mitts.
Scaffolds
Scaffolds are highly beneficial when working at a height for sustained periods of time. They provide a sturdy platform from which to work and allow you to have your tools and paint supplies at your level for ease of use. Be sure to assemble the scaffold by following all manufacturer instructions and by following all recommended safety procedures.
Scaffolds can be more cumbersome to set up and move around. They also are not as practical an investment as a ladder; hence many DIYers opt to rent them for specific projects when needed. Your local Rapid True Value hardware store has a number of scaffold options available for purchase or rent. Contact your store for details.
SAFETY ALERTS!
Before climbing or using a scaffold, be sure it is completely assembled and locked into position. If your scaffold has wheels, be sure they are locked or otherwise made immobile.
Do not exceed the scaffold weight limit.

Step 2: Prepare the Room
Prep your project space by protecting the floor and any furniture in the room from spills or splatters. Remove all furniture to another area or cover it with drop cloths or tarps. Cover the floor with drop cloths or tarps and fasten them down using painter’s tape. Remove any wall hangings and decorations. Temporarily take down any ceiling fans and light fixtures.
SAFETY ALERT!
Before you remove any electrical fixtures, turn off power to the room by turning off the breaker for that circuit at the main electrical panel. Mark the switch with a warning tag (a simple piece of tape will do) to make sure no one flips it back on while you're working. Remove the light bulbs before you remove the fixture. Bring in portable work lighting if needed to help you see properly.
Once everything is cleared from the room or masked, wash the walls and ceiling using clean cloths, mild detergent, and warm water. Let the walls and ceiling dry for at least one hour before priming and painting.
Step 3: Prime/Paint the Ceiling
Start with the ceiling first. Climb on to your ladder or scaffold with your supplies and begin by priming first with Rapid True Value EasyCare® Ultra-Premium Interior Primer/Sealer. Mask the perimeter of the ceiling with painter's tape where it meets the walls. It's also helpful to "cut in," or outline the edge of your ceiling with a small, angled paintbrush before priming/painting the whole ceiling. Use an extension pole and roller to help you extend your painting reach. After the primer has dried, paint with Rapid True Value EasyCare® Ultra-Premium Ceiling Paint in the colour of your choice.

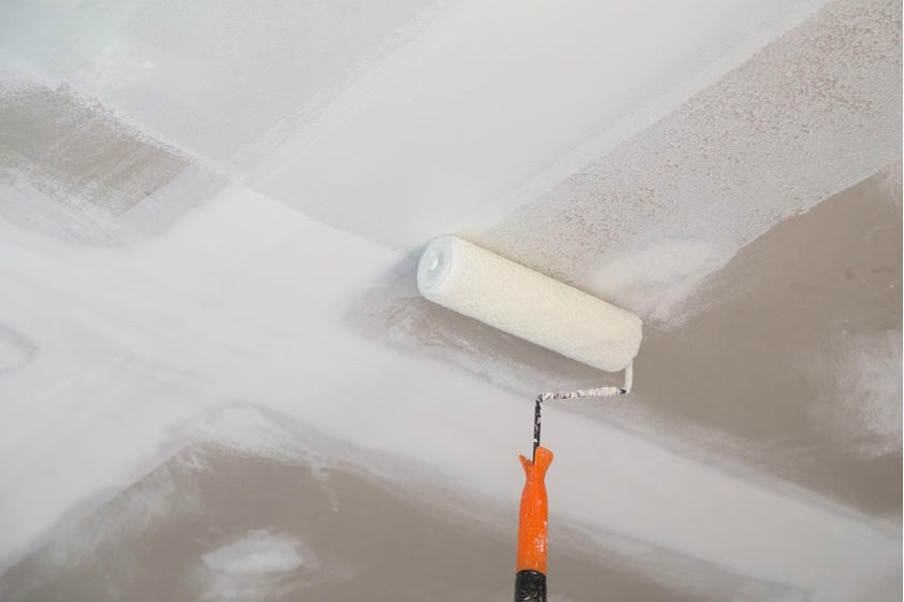
Dip the roller in paint, in the deep section of the tray. Roll it back and forth in the shallow end to get rid of excess paint. When the roller is evenly covered, begin rolling out 6-ft. square sections on the ceiling. Use a series of overlapping "W" strokes from right to left, then back from left to right using horizontal strokes. Make sure to "feather" the edges of the squares, using less pressure when you get to the edges. This prevents creating a line when the paint overlaps from another square. Keep working with the 6-ft. squares until the entire ceiling is painted. The ceiling should dry in a few hours.
Step 4: Prime/Paint the Walls
Prime and paint the walls. Apply a coat of EasyCare® Ultra-Premium Interior Primer/Sealer before you paint so the paint adheres better and lasts longer. Additionally, priming is necessary if your walls are stained, or if you wish to use light-coloured paint over dark walls, or when you’re painting a bright colour, such as yellow or red.
Apply primer with a roller and extension pole. Start at the top of the wall by painting strokes in a “W” shape then fill in that “W” with paint. The painted block should be around 2’ X 4’ in size. Once you fill in the block paint another “W” below the block and fill it in. Continue this process down the wall, coming down from your ladder or scaffold to paint the bottom section of the wall while standing on the floor.
SAFETY ALERT!
Open windows to make sure you’re painting in a well-ventilated area. Use a box fan placed in windows or doorways to help with ventilation.
HELPFUL TIPS
One gallon of paint usually covers 300 to 400 square feet. Don’t forget to double your measurements for two coats.
Slide the roller cover a little bit off the frame to get closer to doors, ceilings, and windows.
Touch up any missed spots when the paint is still wet to ensure an even sheen. Be sure to roll in the same direction you painted originally.
Before you begin painting a new wall, make sure you have enough paint left in the can to finish the entire wall. The same paint colour can vary slightly from one can to another, so try not to use two different cans on one wall. If you are using more than one gallon of paint, it is recommended that you intermix the gallons.
If necessary, apply a second coat of paint using the same technique as the first. Allow the first coat to dry for four hours before applying a second coat.
Step 5: Clean Up
Pick up your drop cloths or tarps and close your paint cans. Dispose of used paint or sealant cans appropriately. Cleaning paintbrushes and other tools can be made easy with warm water and soapy water. Thoroughly rinse your roller covers and brushes in water (if you used latex paint) or paint thinner (for oil-based paint) until the solvent runs clear, then place them in a brush/roller spinner, if you have one, to remove excess liquid. Store in their protective sleeves or hang them on nails or hooks. Pick up drop cloths carefully, making sure not to spread around any paint that may have gotten on them. Next, remove painter's tape at a 45-degree angle to avoid removing any fresh paint. Remember that the longer it stays on, the harder it is to remove.
Great job! Your high walls and ceilings have been updated. Enjoy the freshly painted majesty of your rooms.
Source: True Value


